POS Support
-
 Continue Reading »
These steps will help you to install a Star TSP100U (TSP143U) USB printer on Microsoft PC or Laptop or POS Terminal with Timely and Microsoft Windows installed on it
STEP 1: INSTALL THE PRINTER SOFTWARE ON WINDOWS
1. Download and install the printer software / driver from the Star Support website:
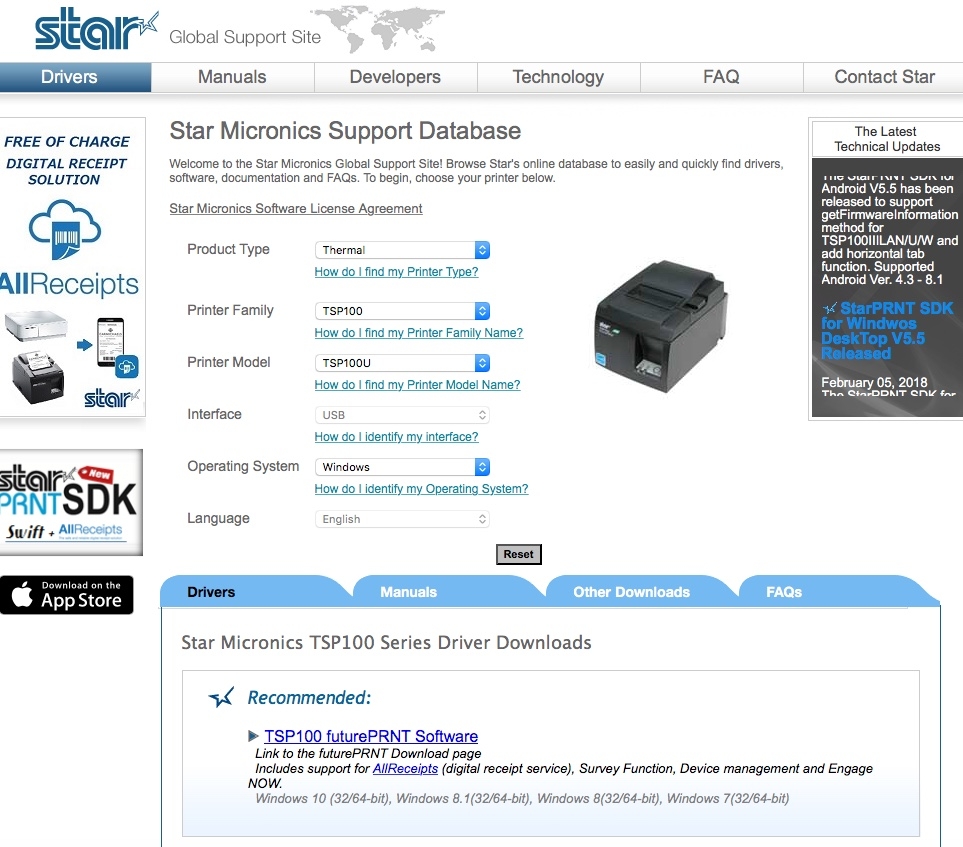
2. Click on the "TSP100 futurePRNT Software" link to progess to the download page
3. Once installed, open the Control Panel on your Windows device and select Devices and Printers from the options.
4. Right click the Star TSP100/TSP143/TSP100U printer (the latest is the TSP100U model).
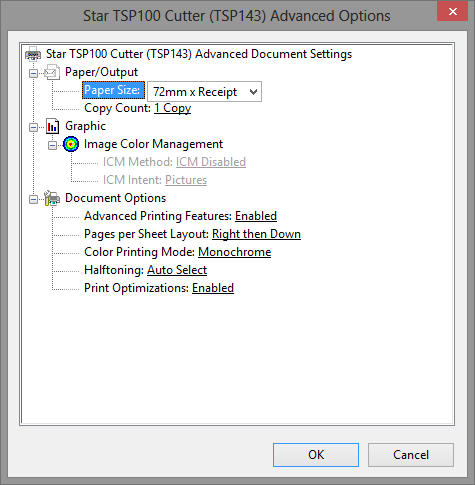
5. Choose Printing Preferences from the option, then click Advanced.
6. Under Paper Size, select "72mm x Receipt" (or 80mm if not available)
7. Click OK twice to return to the Windows list of devices.
8. Right click the same printer again, and choose Printer Properties.
9. Select the Advanced tab.
10. Click Printing Defaults and then Advanced from the options.
11. Under Paper Size, make sure that "72mm x Receipt" is selected:
12. Click OK twice to confirm.
13. Your USB Star printer is now set up, ready for receipt printing from Timely.
STEP 2: ENABLE THE PRINTER ON TIMELY:This step is to "tell" Timely to print receipts instead of invoices, otherwise, you'll end up with tiny invoices.
1. In Timely, go to Setup > Sales settings (From the main menu).
2. Scroll down to the Invoice printing settings section:
3. Next to each location, choose Thermal receipt from the dropdown: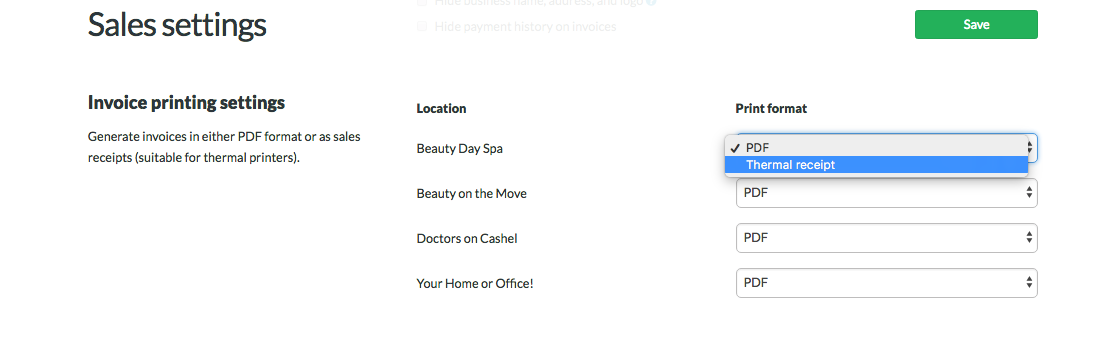
4. Click Save to apply your changes.
5. When you are printing from the Calendar, or when viewing the invoice, your invoice will be displayed and printed in receipt format: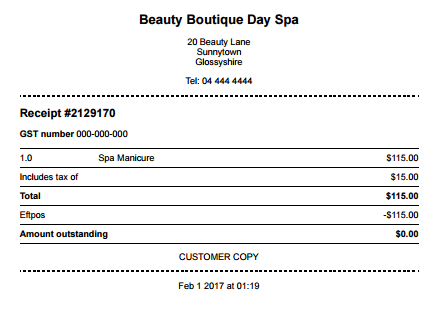
Note: When you print an invoice from the Sales tab this will print the invoice in the full PDF format, regardless of your settings. -
 Continue Reading »
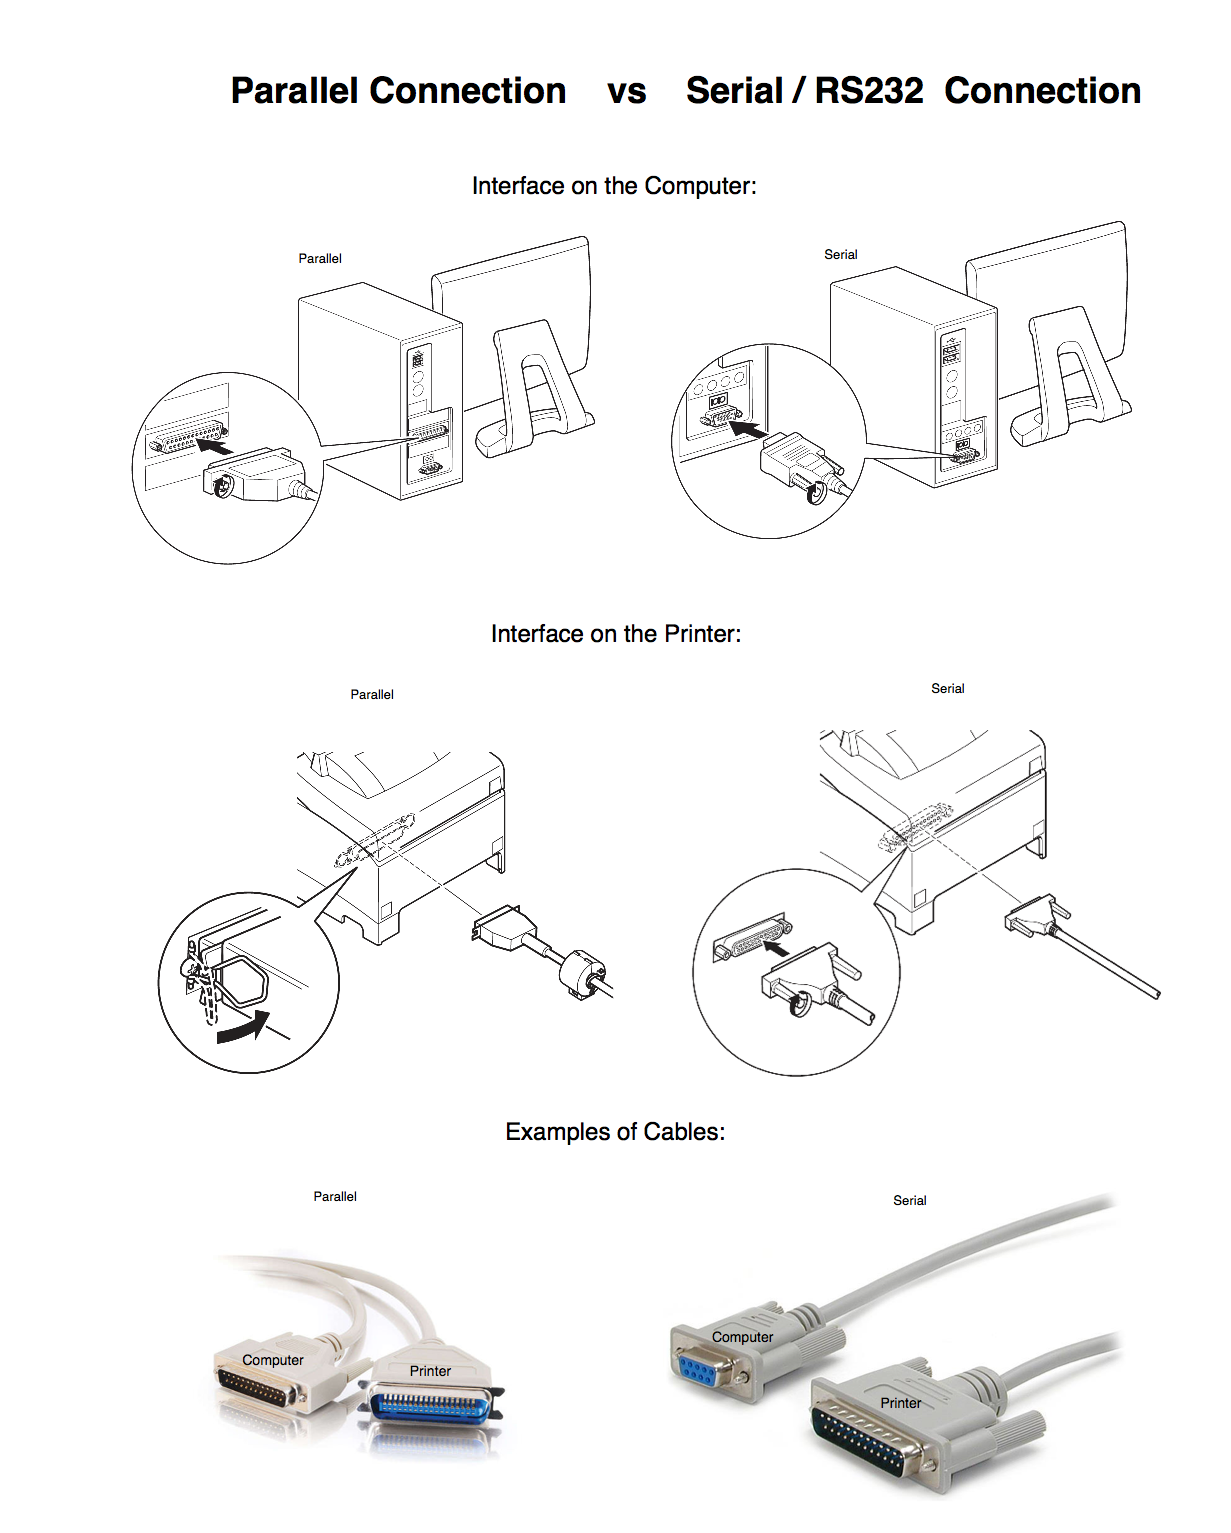
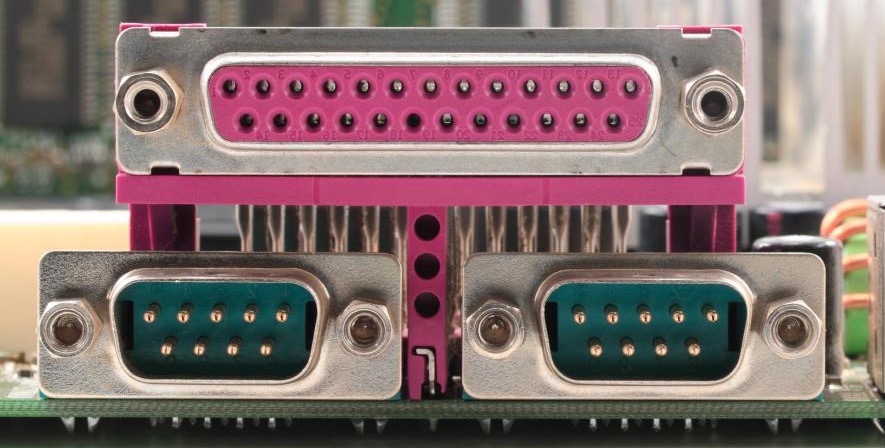
Interface on the Computer:
The parallel port found on computers is for connecting peripherals, where many bits of data are sent at once, in parallel communication, and requires multiple data lines in their cables and are also larger than the modern serial ports. Modern computers tend to be manufactured without serial ports, and require serial-to-USB converters to allow compatibility with Serial / RS-232 serial devices.
The serial port is a serial communication interface, that sends bits of data, one at a time, requiring one data line and are smaller than the parallel ports. Suprisingly and interestingly, interfaces such as Ethernet, FireWire, and USB sends data as a serial stream. Serial port identifies hardware as compliant to the RS-232 standard, intended to interface with a modem or with a similar communication device.
Serial ports are still used in applications like point of sale systems, scientific instruments, industrial automation systems, and some industrial and consumer products. Server computers may use a serial port as a control console for diagnostics. Network equipment (such as routers and switches) often use serial console for configuration. Serial ports are used in these areas as they are simple, cheap and their console functions are highly standardized and widespread. A serial port requires very little supporting software from the host system.
Interface on the Printer:
Pre-2000, desktop printers had one of two interfaces: serial and parallel. The type of interface decreed how fast the cable between printer and computer carried data.
A parallel interface was faster, using a thicker, more complex cable.
The serial printers were cheaper but slower though it allowed for larger distances between the printer and computer.
Today, the parallel port interface is practically non-existent because of the popular Universal Serial Bus (USB) devices, along with network printing using Ethernet and Wi-Fi connected printers.
Examples of Cables:
The parallel interface needs many wires to carry 8 or more bits of a byte at a time, adding to the cable's complexity and cost.
Cables for serial printers use multi-wire cables fitted with nine or 25-pin "D" type miniature connectors, one pair of wires for sending, one for receiving, an electrical ground and data signalling wires. It uses two wires to carry data each way, sending data one bit at a time. A printed document becomes a stream of ones and zeros in single file.
Sources:
https://en.wikipedia.org/wiki/Parallel_port
https://en.wikipedia.org/wiki/Serial_port
http://smallbusiness.chron.com/serial-printer-57640.html
https://www.techwalla.com/articles/difference-parallel-port-serial-port
-
 Continue Reading »
Troubleshoot when the Star Micronics mPOP cash drawer does not open
There are two methods to open the mPOP cash drawer:
1. Manual method: You can use the lock release lever to open the cash drawer by hand.
2. Electronic method: If the "drawer open function" has been programmed with the multi-function button, you can use the multi-function button to open the drawer. Please note than anyone with access to the mPOP will be able to open the drawer if they know about this feature.
Manual method:
1. Use the lock release lever:
a. Free the mPOP unit which may be secured by brackets or the mount kit.
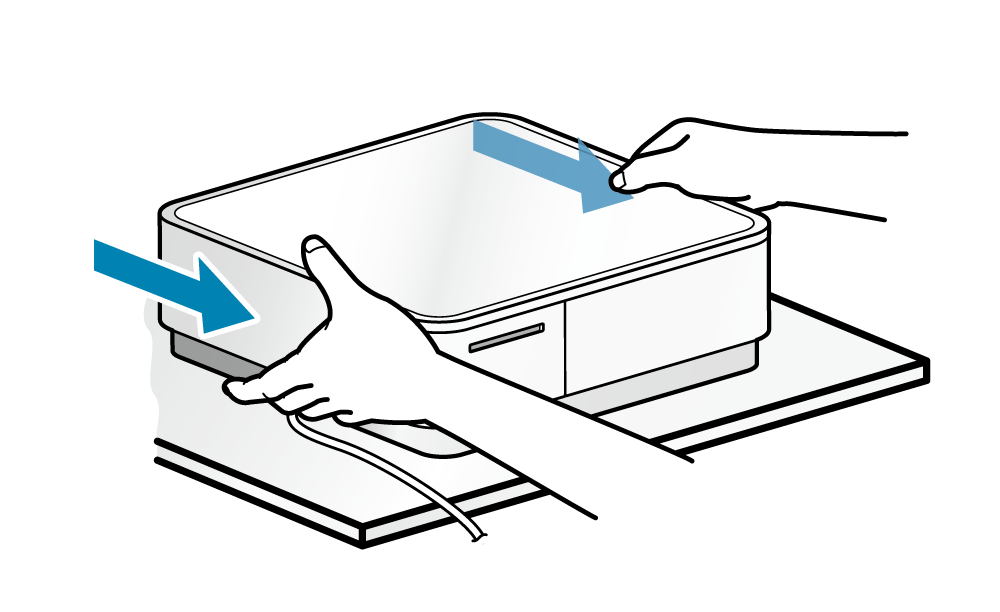
2. Open the cash drawer:
a. With the left side or right side of mPOP at the bottom, lift and operate the lock release lever located towards the back on the bottom surface
b. Insert something slim and tapered in the hole of the lock release lever (like a pen) and by sliding this to the front side the cash drawer will open.
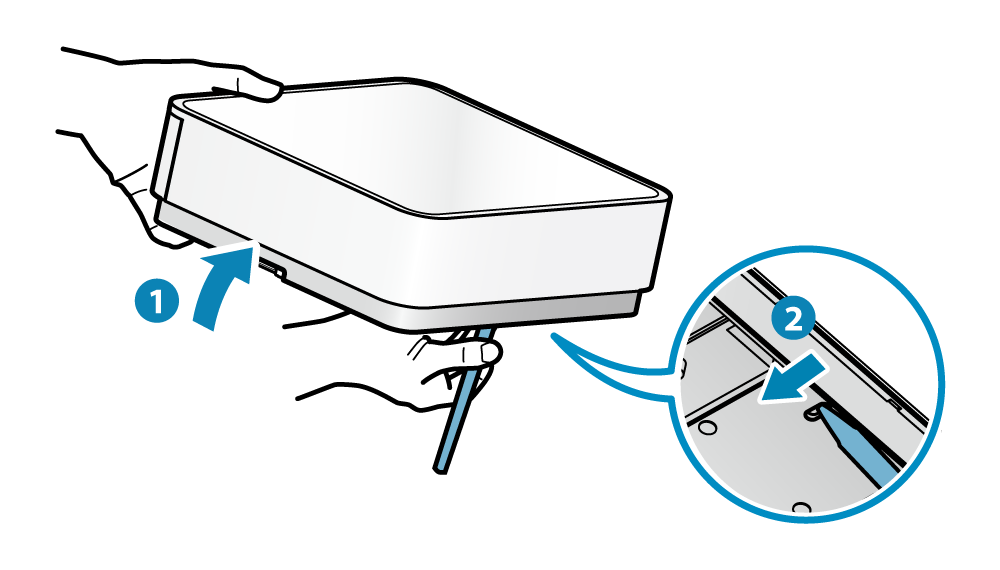
Warning: As tilting mPOP too much will cause the contents of the cash drawer to spill out when the drawer is opened, do not tilt more than necessary when lifting mPOP. Be careful, as the cash drawer will spring open.
Electronic method: Using the multi-function button
1. To Enable or Disable the multi-function button:
a. Download the mPOP Utility App on you iPad/Android device: www.star-m.jp/mpop-app.html
b. Open the MPOP Utility app, and ensure that the MPOP is connected to the App, and that the status light on the mPOP is solid blue.
c. On the lower tab of the app, select “Settings”
d. Be careful what you do here, you may invalidate your mPOP warranty if you change the wrong settings.
e. Now select: “Memory Switch Settings” (Green icon)
f. On the “Function” tab, scroll down to reach “Drawer Open Switch”. Tap on it, and select “Enable” to Enable the multi-function button, or Disable to stop using the multi-function button to open the cash drawer.2. Now open the cash drawer using the multi-function button:
a. Turn the power on and press the power switch on the side of mPOP.
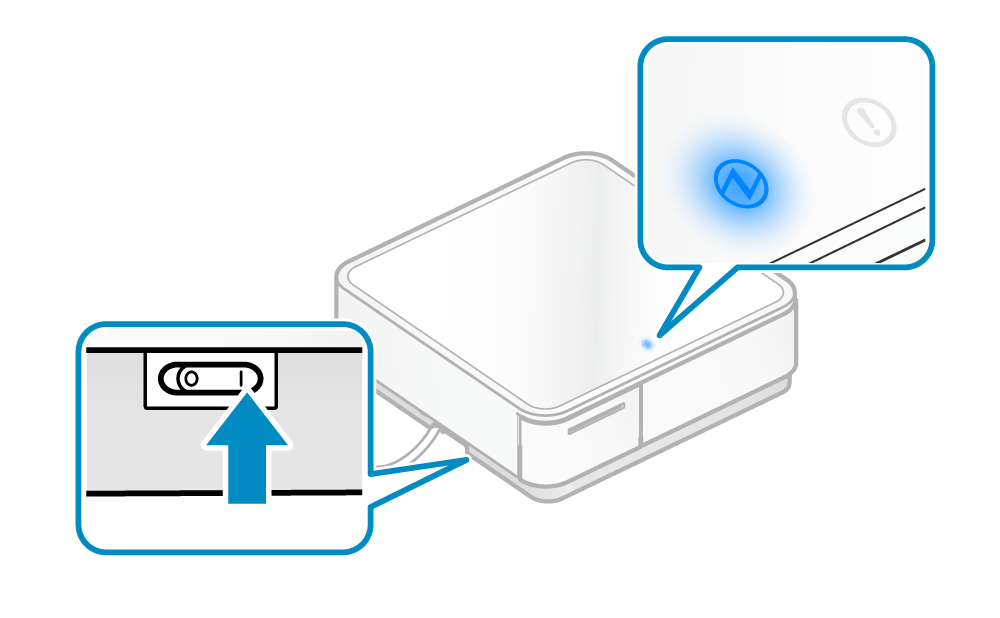
b. Pull out the printer and push the front face of the printer to unlock and pull out the printer.
c. Open the cash drawer and press and hold (1 second or more) the multi-function button to open the cash drawer.
Note: Be careful as the cash drawer will spring openNeed mPOP receipt paper rolls? Click here to purchase:
-
 Continue Reading »
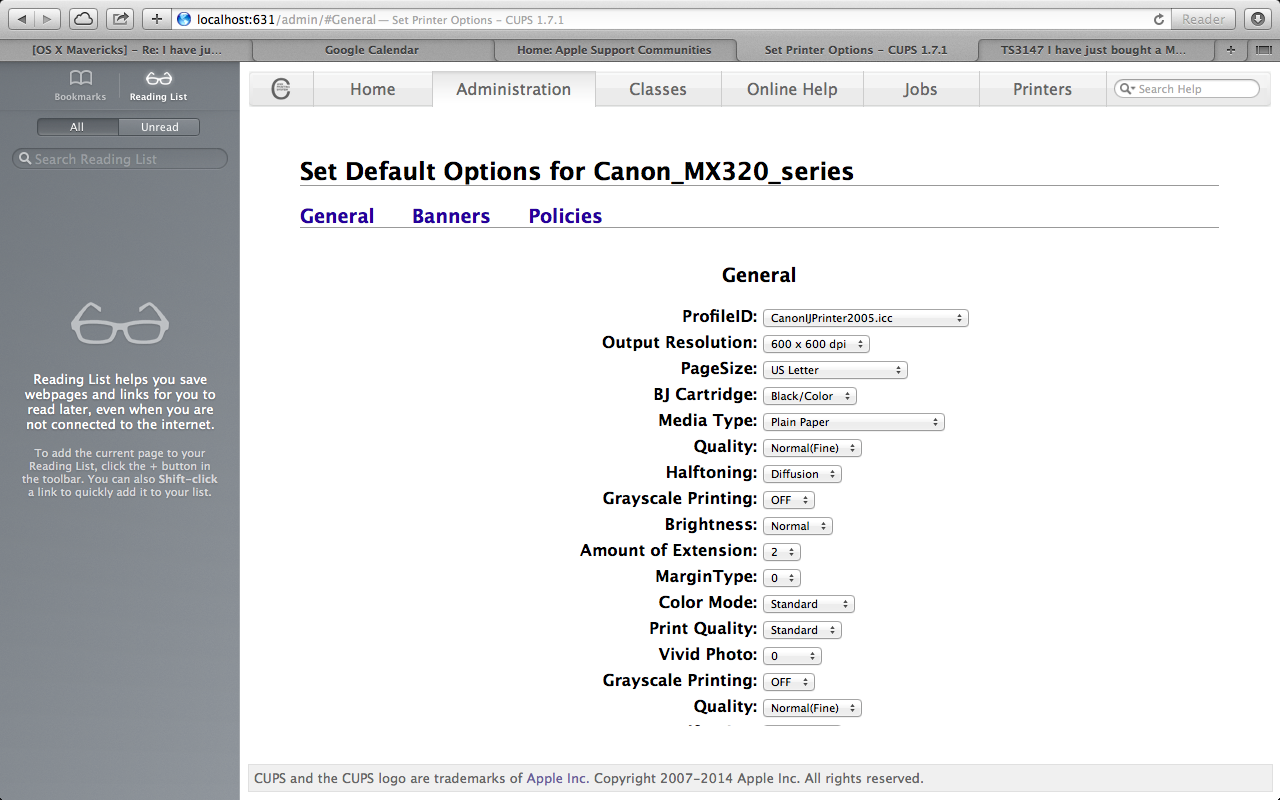
CUPS is a network printing service used on Mac computers, and allows you to setup your printers on a network, and customise options such as the page settings, cash drawer setup, etc.
1. Go to http://localhost:631/printers/
A screen will appear saying 'Web Interface is Disabled'
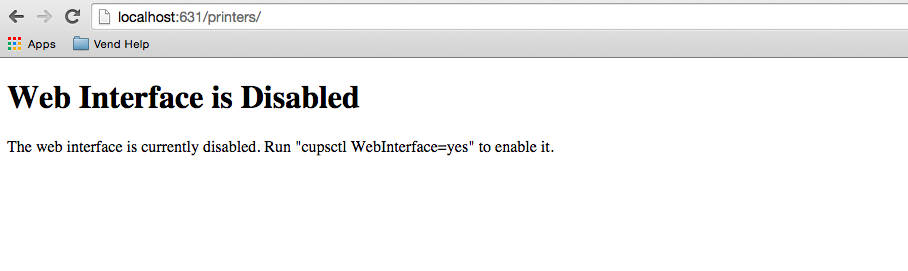
To enable CUPS:
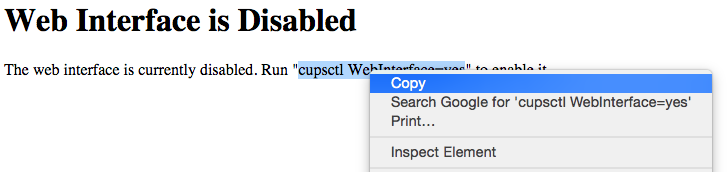
1. Select and copy the following text: "cupsctl WebInterface=yes"
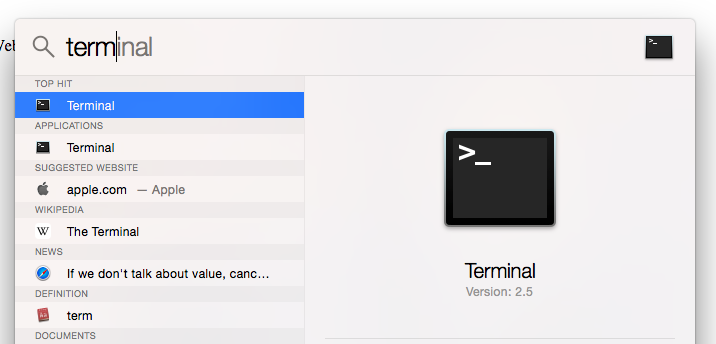
2. Next, click on the magnifying glass in the top right hand corner of your screen and search for "Terminal".
3. Once in the terminal programme, paste teh following text into it: "cupsctl WebInterface=yes" and click enter.
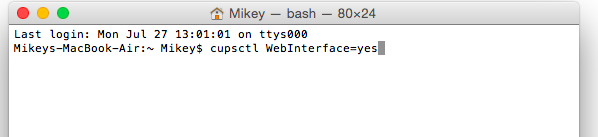
Now you should be able to go to http://localhost:631/printers/ and find/view your installed printers.
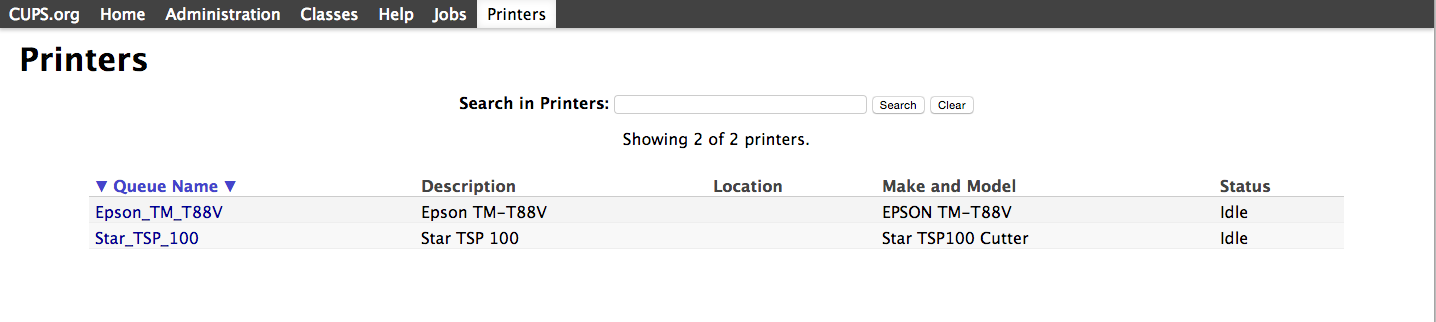
To change settings for your printer, or to set up your cash drawer for example, click the desired printer, and modify the options provided.
-
 Continue Reading »
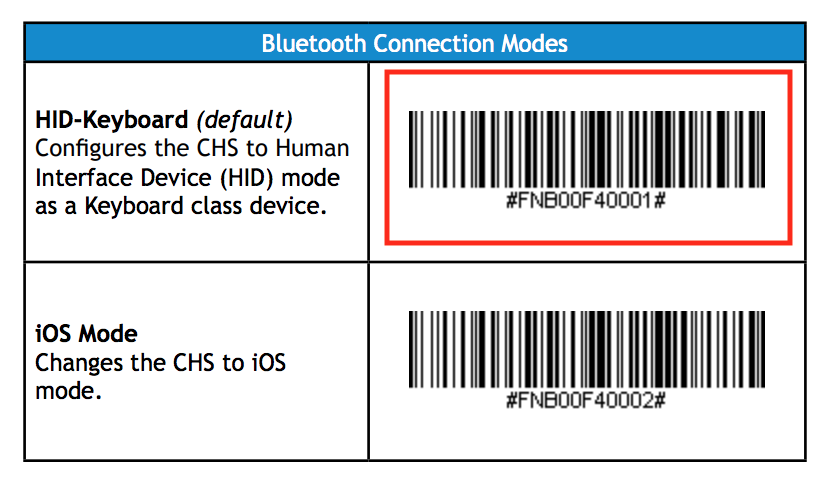
Step by Step guide on how to program your Socket 7ci out of sleep mode, to speed up the Point of Sale sales process.
The Socket 7ci cordless and bluetooth barcode scanner will power off every 2 hours by default, when not in use.
To disable the power off timer, please scan the below the command barcode to configure your Socket scanner.
Note: The Socket scanner should not be paired to the iPad or PC/Mac before scanning the below command barcode, or simply turn off your Bluetooth on the iPad or PC/Mac before scanning the command barcode:
Once the above barcode has been scanned (there will be multiple beeps to indicate the command change), you can pair the scanner to your device, or switch on the bluetooth on your device again.Happy scanning! -
 Continue Reading »
Great little feature from Socket Mobile: Pop-Up iOS Keyboard using the Socket Mobile Bluetooth Barcode Scanner
Luckily there are some manufacturers, like Socket Mobile, that have scanners capable of acting as HID Bluetooth devices which retains the virtual keyboard functionality, by double tapping the power button, allowing for simultaneous scanning and keystrokes.
Whatch this short video for a simple demonstration of this unique feature with Socket’s Apple certified CHS Series scanners.
-
 Continue Reading »
Epson TM-T82 Thermal POS Receipt Printers can be tricky to install if the process is not followed correctly.
The main cause for the printer not printing is if the printer is plugged into the PC before the Epson Driver/Software is installed. (If you have not installed the printer yet, go to Step 3)
Step 1: Self test to eliminate faulty hardware:
1. Ensure that there is a roll of paper in the printer.
2. Press the paper feed button to ensure the printer is feeding paper.
3. Now turn off the power switch on the receipt printer.
4. With both hands: Hold down the paper feed button and switch the power on, whilst holding down on the feed button for at least 3 seconds.
5. If the Epson TM-T82ii starts printing out your settings then you can sure the problem is not with the hardware, it may be the USB port or the software that you are using
6. If you can’t get a print out you may have a hardware problem, or the paper was installed the wrong way round (The thermal side should be facing downwards, scratch the paper to establish the thermal side of the paper)
Step 2: De-Installation steps: (If already installed incorrectly, these must be followed exactly in order)
1. Disconnect the printer completely from the PC
2. Uninstall All the Epson Software / Drivers on the PC
3. Now follow the below steps in "C. New Installation"
4. Only now, plug in the Epson Printer into the USB port again.
Step 3: New Installation steps: (These must be followed exactly in order)
1. Disconnect the printer completely from the PC
2. Insert CD provided and run the Driver Software ( .exe file) on the CD OR
3. Download the Driver from the internet: Epson T82 Driver link
4. Install Driver Software and set as default printer, save settings.
5. Do a test print, either form your POS Software, or from the printer driver.
6. Remember to check your cash drawer settings in the printer driver, if you are using a cash drawer.Do you have the TM-T82 Epson USB & Ethernet model?
If you have a TM-T82 with both USB & Ethernet interfaces, you may have to change the interface between USB and Ethernet, as only one interface can be used at any given time. To establish what interface you currenly have active on the printer, and how to change it, please follow the steps in the below video. Please activate your YouTube captions for step by step instructions:
Click here for the T82 Software Installation Manual on the Epson Website
To purchase a Epson TM-T82 printer, click here
To purchase receipt rolls for the Epson TM-T82 printer, click here